The standard Uki Otoshi [in Budoshin Ju-Jitsu] is a really beautiful
throw once you learn it. However, getting there can be a very
frustrating process. I learned the throw after many hours of frustration
and trying to believe that I could do the throw - get both of my feet
off the ground straight out to the right side of my uke, snap turn to my
left, and execute the throw. Much easier said than done.
In the mid
1970's three of my junior high brown belt students showed me an easier
way to learn the technique. We tried it with a few other students and
discovered that the brown belts creativity had made a major breakthrough
in helping student easily learn a "difficult" throw.
Learning the
throw requires three people -- tori, uke, and tori holder.
Please keep
in mind that this uki-otoshi has a physical limitation. It works best
when used against people who are bigger [taller & heavier] than you are
unless you can execute this throw exceptionally well [which some people
can]. Conversely if you try to do this on a person smaller [lighter or
shorter] than you are you are liable to force them backwards onto the
ground with you on top of them.
Thanks to Glenda Perl for being the
tori, Byron Davis for being the uke,
and Michael Langewisch for the photography.
This uki otoshi can be
found on page 72 of Jujitsu: Basic Techniques of
the Gentle Art, or Technique #8 on DVD #3 of the
Budoshin Ju-Jitsu Black Belt Home Study Course.
 |
Glenda [tori] grabs hold of Byron's [uke] sleeves. [It would
have been better if Glenda had grabbed around Byron's neck from
his left side or over & around his right shoulder/arm[ as for a
karada makikomi - body winding throw]. It would have put her
back against Byron's chest when she jumped up. However, that is
not of critical importance in this series of pix. |
|
|
|
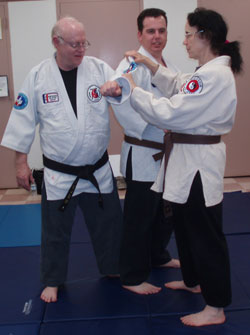 |
George [tori holder] has reached in & grabbed tori's belt in her right
front. |
|
|
|
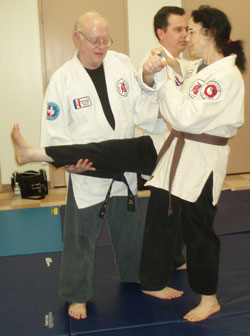 |
Glenda then kicks her right leg up [which George grabs & holds] as she
comes in closer to Byron to set up the uki otoshi. George is also still
holding her belt. |
|
|
|
 |
Glenda kicks her left leg
up as George holds both legs with his right arm and her body by holding
onto her obi/belt. George is holding her in this position off of the
ground. |
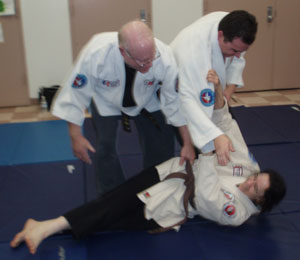 |
As Glenda pulls Byron's sleeve and turns to
her left George slowly lowers her to the ground, holding onto
her obi until she gets close to the ground. |
|
|
|
 |
Once Glenda gets the throw going, George lets go completely
and Byron takes the fall.
This process is repeated at least 2-3 more times as the student
gains confidence. Once the tori holder [or sensei] decides that
the student is jumping up & executing the throw properly he will
hold onto the belt & legs for less and less time. Usually around
the 3rd-5th time the tori holder can just reach for & hold the
belt very lightly & as the tori comes in to execute the throw,
let go completely. Do NOT tell the uke you are not going to hold
onto the belt until after the throw during which you did not
hold onto the belt. Let tori know ONLY after the tori has
executed the throw completely on their own.
Wow! Tori is now doing uki otoshi completely on his/her own. |
|
|
|
|
Note:
If this throw just boggles your mind, you physically cannot do it, or
you can't find a bigger uke to practice on, there are some optional uki
otoshi you can do. In other words, you're not just limited to this
particular uki otoshi for testing purposes.
Other uki otoshi listed below are also acceptable:
Uke Otoshi - Floating
Drop Throw - reverse for hip throw or drop throw
Jujitsu: Intermediate Techniques of the Gentle Art,
p. 176
Senaka Hiki Nage -
Shoulder Pull Throw - reverse for hip throw
Jujitsu: Intermediate Techniques of the Gentle Art,
p. 178
There may be other
floating throws that are not listed here which are also acceptable.
|
|
|
|
|
|
|
Click
here to return to Selected Techniques

